

We had a pumpkin plant of an indeterminable type pop up in the middle of a tomato hoop. Not realising what a monster we were unleashing, we let it grow. It was the biggest greenest thing in the garden and we were quite proud of it. One day we spotted a wee pumpkin growing from it and were SUPER excited. A few weeks later and we have a giant supermarket sized totally normal looking pumpkin growing in our garden! This was amazingly good fun.

When a second pumpkin started growing off the same vine we got a bit more serious about our illegitimate babies and decided to "grow pumpkins" (not they had needed our help up to this point!)
Here's what I did...
When we found rogue, self set pumpkin we let it grow but directed the main vine to areas of full sun but not in the vege patch. (ie, the place where normal people would have grass!) Pumpkins take up soooooo much room that we have started encouraging them out of the garden beds and then we guide them around the garden edging. This works for us as we have got slightly raised beds and we wind the vines around the edges..
They are strong AND persistent so staking them in place has been working for us. We simply place a stick in the ground that stops the vine from heading in the direction that it wants to go and direct it where we want it to go.
Pumpkin vines seem to grow about 10 feet or so and then send off another vine on the side. Depending on how much room you have, you can cut the extra side vines off but they seem to put up female flowers (the ones that will grow the pumpkin) just off the side shoots of the new vine - or maybe its just mine that do that!!


In the morning when I'm feeding the chooks, weeding the garden, drinking my cup of tea (and getting my PJ bottoms covered in mud), I check the progress of each baby girl flower. When one finally opens up, there's great excitement!
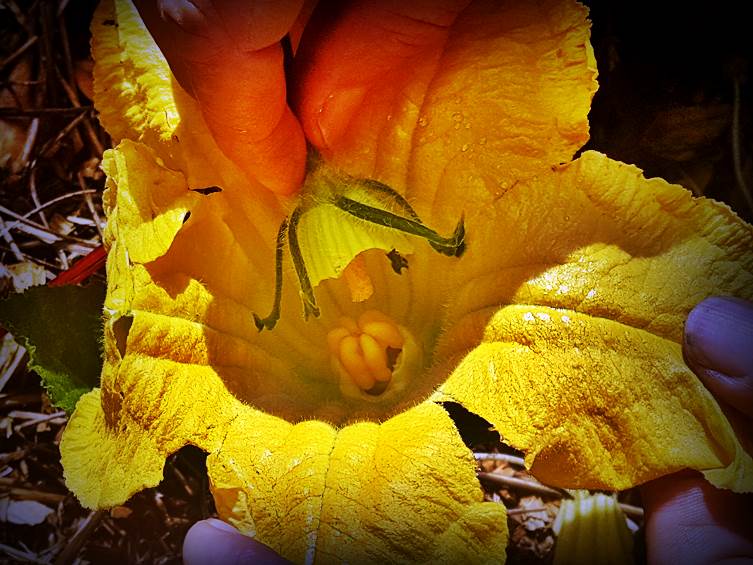
So this photo is the open female. If you cant tell from the baby pumpkin bit at the bottom, you will certainly be able to tell her from the male as the reproductive parts pretty much correspond to the human equivalents!

This is the inside of the male pumpkin flower. Now you can just get out a small paintbrush and tickle the inside of the boy flower attempting to get as much pollen as possible on the brush and then tickle the female flower hoping to lose as much pollen as possible onto the female...

But sometimes you have too much mud on your feet to make going back inside for a paintbrush a great idea, so you can simply pick the male flower and gently take off all his petals, leaving a small bowl at the base and taking care not to lose any pollen if you can help it...


If you have successfully pollinated the female flower (or simply let nature take its course and let the bees do it for you) the flower will close up the same day and either fall off or wither away over a few days. The pumpkin will continue to grow as long as there is enough nutrients and water in the ground.

Eventually you will be able to prop the new pumpkin up the way its meant to go and I place a plastic container upside down underneath it to stop the new pumpkin from sitting in the mud. We get a lot of rain up here and I don't want to lose a pumpkin to rot because of the constantly wet ground.

Something I have noticed is that you get a flower at each leaf node. They are mostly male flowers like this one in the photo and so when I spot a female flower, I put a stick in the ground to show me where she is so I can keep an eye on her to make sure she gets pollinated on that half day opportunity when it arises.
I have also noticed that you get roots all along the vine. See the white roots in the background looking for a place to settle into the soil? These will help feed the vine and are a good thing. Moving the vine too often will mean these vital supply lines are cut off and the plant is relying on the main root ball. I try to guide the new growth to where I want it to go by staking it in place.
In this photo is also the beginnings of a new side shoot. I reckon you get a female flower within a few feet of the beginning of these side shoots. I am starting to consider pruning my pumpkin vines but think that if I cut the end off the vine, I will encourage the side shoots which might not be in the place I want them to be - these vines are soooo sprawly.
I have waited till the side shoot has a female flower and pollinated it. Once the fruit has set, then I cut that side shoot back to a foot or so beyond the new pumpkin. I read somewhere that I should put the cut end of the vine that's still connected to the plant into the ground to stop rot or disease from getting in but so far my ends have "dried" up a bit and all has been good.

Yesterday I discovered this pumpkin that I hadn't seen before climbing up in the choko trellis! This one grew from the compost that I put in the chocko bed and has managed to pollinate with out me - so the bees are doing their job well! I'm not sure how I'm going to support this pumpkin when he gets bigger as this trellis was never meant to hold a weight like his. I'm hoping to put him in an onion bag or in to a stocking cradle and support him by tying him on the star picket that's about a foot away...
Here's hoping!
What hints and tips do you have for pumpkin growing? Id love to hear them! Link to your experiences in the comments section!
Score card:
Green-ness: 5/5 for growing your own food!
Frugal-ness: 5/5 for doing it without spending a cent!
Time cost: Not a huge amount for pumpkins - just keeping and eye on them and guiding the vine where you want it - and pollinating!
Skill level: Pretty basic gardening I think - Pumpkins can look after themselves!
Fun-ness: Great fun to wait for the girls to open and pollinate them - even more fun to watch the pumpkin get bigger and bigger... and bigger!!

When a second pumpkin started growing off the same vine we got a bit more serious about our illegitimate babies and decided to "grow pumpkins" (not they had needed our help up to this point!)
Here's what I did...
When we found rogue, self set pumpkin we let it grow but directed the main vine to areas of full sun but not in the vege patch. (ie, the place where normal people would have grass!) Pumpkins take up soooooo much room that we have started encouraging them out of the garden beds and then we guide them around the garden edging. This works for us as we have got slightly raised beds and we wind the vines around the edges..
They are strong AND persistent so staking them in place has been working for us. We simply place a stick in the ground that stops the vine from heading in the direction that it wants to go and direct it where we want it to go.
Pumpkin vines seem to grow about 10 feet or so and then send off another vine on the side. Depending on how much room you have, you can cut the extra side vines off but they seem to put up female flowers (the ones that will grow the pumpkin) just off the side shoots of the new vine - or maybe its just mine that do that!!

This is an open female pumpkin flower - really easy to tell apart from the male flower - this will become necessary knowledge in a moment or two!

The embryonic female flowers can be identified even when they are only a few centimetres long and still curled up in the emerging vine tip. You can spot them even smaller than this one.

I track the location of these tiny flowers by putting a long stick in the ground next the flower. The girls flowers only stay open for about half a day and if they are not pollinated, there will be no pumpkin. We are having so much fun growing something (that is, pumpkins) in our recently built gardens (that look more like a Mars landscape than anything else) that we want to see how many pumpkins we can actually produce this year! So we are keen to make sure that each and every girl flower gets pollinated!

This is the male flower! See no swollen bit at the bottom! Super easy!

In the morning when I'm feeding the chooks, weeding the garden, drinking my cup of tea (and getting my PJ bottoms covered in mud), I check the progress of each baby girl flower. When one finally opens up, there's great excitement!
So this photo is the open female. If you cant tell from the baby pumpkin bit at the bottom, you will certainly be able to tell her from the male as the reproductive parts pretty much correspond to the human equivalents!

This is the inside of the male pumpkin flower. Now you can just get out a small paintbrush and tickle the inside of the boy flower attempting to get as much pollen as possible on the brush and then tickle the female flower hoping to lose as much pollen as possible onto the female...

But sometimes you have too much mud on your feet to make going back inside for a paintbrush a great idea, so you can simply pick the male flower and gently take off all his petals, leaving a small bowl at the base and taking care not to lose any pollen if you can help it...

Like so...
and then gently rub the two parts together to maximise the pollen attaching to the female flower.

You can use more than one male flower if you have them and want to be sure. You can also cross pollinate with another type of male pumpkin flower and see what happens! Make sure you shake all that male pollen down onto the female.

If you have successfully pollinated the female flower (or simply let nature take its course and let the bees do it for you) the flower will close up the same day and either fall off or wither away over a few days. The pumpkin will continue to grow as long as there is enough nutrients and water in the ground.

Eventually you will be able to prop the new pumpkin up the way its meant to go and I place a plastic container upside down underneath it to stop the new pumpkin from sitting in the mud. We get a lot of rain up here and I don't want to lose a pumpkin to rot because of the constantly wet ground.

Something I have noticed is that you get a flower at each leaf node. They are mostly male flowers like this one in the photo and so when I spot a female flower, I put a stick in the ground to show me where she is so I can keep an eye on her to make sure she gets pollinated on that half day opportunity when it arises.
I have also noticed that you get roots all along the vine. See the white roots in the background looking for a place to settle into the soil? These will help feed the vine and are a good thing. Moving the vine too often will mean these vital supply lines are cut off and the plant is relying on the main root ball. I try to guide the new growth to where I want it to go by staking it in place.
In this photo is also the beginnings of a new side shoot. I reckon you get a female flower within a few feet of the beginning of these side shoots. I am starting to consider pruning my pumpkin vines but think that if I cut the end off the vine, I will encourage the side shoots which might not be in the place I want them to be - these vines are soooo sprawly.
I have waited till the side shoot has a female flower and pollinated it. Once the fruit has set, then I cut that side shoot back to a foot or so beyond the new pumpkin. I read somewhere that I should put the cut end of the vine that's still connected to the plant into the ground to stop rot or disease from getting in but so far my ends have "dried" up a bit and all has been good.

Yesterday I discovered this pumpkin that I hadn't seen before climbing up in the choko trellis! This one grew from the compost that I put in the chocko bed and has managed to pollinate with out me - so the bees are doing their job well! I'm not sure how I'm going to support this pumpkin when he gets bigger as this trellis was never meant to hold a weight like his. I'm hoping to put him in an onion bag or in to a stocking cradle and support him by tying him on the star picket that's about a foot away...
Here's hoping!
What hints and tips do you have for pumpkin growing? Id love to hear them! Link to your experiences in the comments section!
Score card:
Green-ness: 5/5 for growing your own food!
Frugal-ness: 5/5 for doing it without spending a cent!
Time cost: Not a huge amount for pumpkins - just keeping and eye on them and guiding the vine where you want it - and pollinating!
Skill level: Pretty basic gardening I think - Pumpkins can look after themselves!
Fun-ness: Great fun to wait for the girls to open and pollinate them - even more fun to watch the pumpkin get bigger and bigger... and bigger!!
Comments